Links contained in this post and elsewhere on my website may include affiliate links. When you make a purchase through these links, I earn a commission at no additional cost to you. I only link to products and services that I love - and that I think you will love, too!

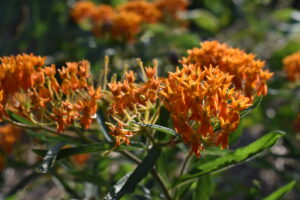
In today’s article, let’s talk about how to plant milkweed seeds. There are a few species of milkweed that are often grown in home gardens, but these directions especially apply to Asclepias tuberosa. Locally, we call this variety butterfly weed. Milkweed is our name for Asclepias syriaca.
These seeds need a little care to get a high germination rate. Most milkweed species need cold temperatures to help break down the seed coat so they can sprout. The seedlings are also sensitive about transplanting. For best results, consider planting them outdoors in the fall. Otherwise, be ready to give the seeds a little extra love.
How to plant milkweed seeds indoors
If you’d rather start your seeds indoors, use your refrigerator as a substitute for cold winter weather. Start two to three months before your last frost date.
Fold a damp paper towel in half and sprinkle on your Asclepias seeds. Carefully fold the paper towel in half again. Label a plastic ziplock bag with the species and the date. Place the folded paper towel with seeds inside and seal the bag.
Place the bag of milkweed seeds in the refrigerator for a month. (I recommend making a note in your garden journal so you don’t forget them!). When the month is up, transfer the seeds to paper pots or peat pellets. Paper pots and peat pellets allow the seedlings to be transplanted in the garden without disturbing the roots.
Keep the soil moist until germination. Milkweed seeds germinate best in warm soils (around 75F) so using a seed mat and a tray with a lid may provide the best conditions. Once the seedlings reach a few inches in height and outdoor soils are warm enough, harden off your seedlings and transplant in the garden.
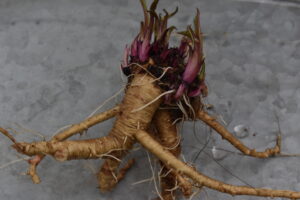
Milkweed can be a little dramatic when transplanted. You may notice all the leaves disappear after your seedlings move to the garden. Your plants will probably be ok, even if they don’t look great. They are just focusing on everything that needs to happen underground to grow their taproot.
How to plant milkweed seeds in the garden
Direct sowing in the garden lets nature do the cold stratification for you. It also allows the plants to establish themselves immediately with no transplanting. In other words, this is the easy method.
This is how I was taught to start milkweed seeds, although I have used both methods. In the fall, decide where in the garden you want your milkweed to grow. Clear away any weeds and prep the soil with a stirrup hoe. Our soil is heavy clay, so we just scratch back and forth with the stirrup hoe until we have a soft 1/2″ of soil on top.
Sprinkle the seeds around the prepared soil, then gently pat down the soil to tamp the seeds in place. There’s no need to cover them with extra soil. Sprinkle some leaves and pinestraw lightly over the top to help protect the seeds from washing away in winter rain.
We don’t usually have snow, but if your garden has snow cover most of the winter, you might not need to add the leaves on top.
The seeds will germinate in their own sweet time once soil warms up in the spring. Mark the area so you don’t forget what you planted and your seeds are all set.
Remember the basics
As long as you remember a few basics, you should have good success growing Asclepias spp from seeds. The key take-aways are:
- Milkweed seeds need a period of cold temperatures.
- These plants have a taproot that doesn’t like to be disturbed.
By giving your seeds extra attention and providing what they need, you’ll have a milkweed patch established in your garden that butterflies will love for years to come!
Photo credit: Agatha Noveille